Friday, 5 June 2020
Hosco DIY LP Special pt. 6
So, the guitar drank most of the oil from the first session. I let it dry overnight, and applied a fourth layer of Danish oil using 600 grit sandpaper and wet sanding technique. Now, after another night of drying, the guitar feels better, there is a smooth feeling in all places, and it looks way better than the day before. As I'm aiming for a junior and not a PRS copy, I think that I will stop the coating process here. I'm sure that after another two or three layers, the guitar would start to look relly fancy, but this is not where I'm heading for with this.
The oil smoothed lots of irregularities in the staining, and deepened the colour everywhere. In my opinion, the back of the neck looks especially great! I'm also happy that I took the risk and tried the burst effect with sanding down the stain from the middle of the body.
I'm tempted to start putting the electronics together, but I think it will be better to wait until tomorrow and see if the oil still needs more time to dry.
Wednesday, 3 June 2020
Hosco DIY LP Special pt. 5
Today, I applied three layers of Danish oil. I have understood that there are roughly two ways of applying it, wet on wet and wet on dry. I decided to use the former one where the oil is added, let dry for 20 minutes, and another layer is added. So, today I applied three coats with this manner, and the guitar is now drying. I have learned that it might take two days for it to dry properly.
Notes:
- I did burn the rags, as told, in the fireplace. Now everyting smells like lighter fluid.
- I did this outdoors, which is good, as the oil smells.
Notes:
- I did burn the rags, as told, in the fireplace. Now everyting smells like lighter fluid.
- I did this outdoors, which is good, as the oil smells.
Tuesday, 2 June 2020
Hosco DIY LP Special pt. 4
So, after gluing the neck and coming into a conclusion that the coat I planned was of a wrong kind, I decided to try finishing the guitar with stain and Danish oil. So, off I went and bought some dark brown stain and ordered a bottle of Rustins Danish oil from UralTone.
I started the staining by sanding the wood down to 360 grit. I'm not sure if that is too much or too little. I also had an idea to leave the bare wood in sight as a decal on the headstock by using a sticker as a masking tape. That did not work out as the stain immediately diluted the glue from the sticker and it fell off.
I applied the first coat with a rag. The result was not very good looking, as expected.
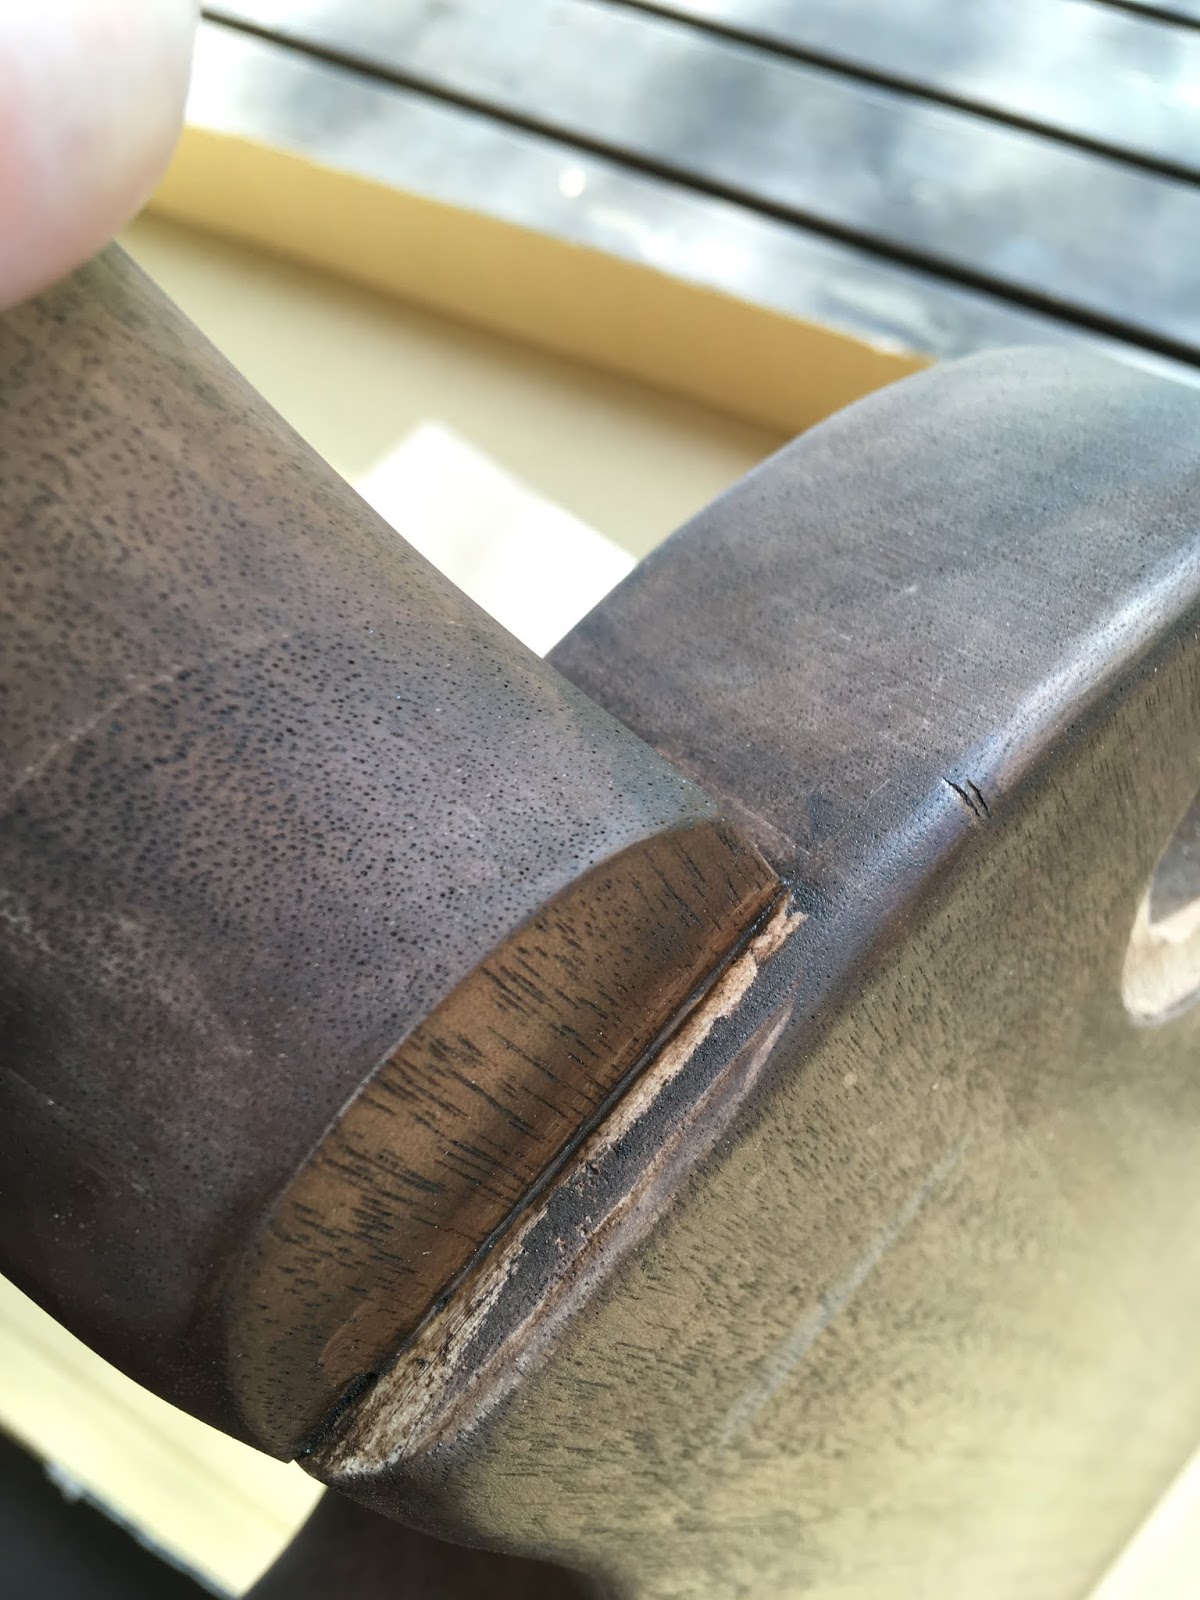
After a few hours of waiting I applied the second coat. At that time it was clear that there were some spots around the neck joint where the stain wouldn't stick. There are invisble traces of glue there that I did not manage to sand off. In that sense it might have been wiser to apply the finish before glueing the neck on. After the second round, I sanded some of the stain off to generate a burst effect. It is difficult to capture the color to a photograph. In reality it is somewhere between the two following figures. Not as red and light, but not as dark either as in the pictures.
I started the staining by sanding the wood down to 360 grit. I'm not sure if that is too much or too little. I also had an idea to leave the bare wood in sight as a decal on the headstock by using a sticker as a masking tape. That did not work out as the stain immediately diluted the glue from the sticker and it fell off.
I applied the first coat with a rag. The result was not very good looking, as expected.
After a few hours of waiting I applied the second coat. At that time it was clear that there were some spots around the neck joint where the stain wouldn't stick. There are invisble traces of glue there that I did not manage to sand off. In that sense it might have been wiser to apply the finish before glueing the neck on. After the second round, I sanded some of the stain off to generate a burst effect. It is difficult to capture the color to a photograph. In reality it is somewhere between the two following figures. Not as red and light, but not as dark either as in the pictures.
After that, I applied the 3rd coat, and did the sanding to that, too. Tried to fit some HW to place just for the looks. The color is about right.
The next step will be the application of the Danish oil.
Some notes:
- I did not manage to get an even coat. There are places where there is too much stain and there are some parts where there is too little.
- The glue will mess up the stain, so more care should be applied.
- Making the burst by sanding is not easy and the result is semi-random. With one piece body that might be an easier task. Now the underlying woods are of slightly differet tone. Also, it is very easy to sand too much as it goes pretty much so that at first nothing happens and then suddenly one swipe is enough to sweep away majority of the stain.
Saturday, 30 May 2020
Hosco DIY LP Special pt. 3
I bought some wood wax (Osmo puuvaha) for coating, just to find out that it does not get along with mahogany. So, I need to go and buy some teak oil instead.
Hosco DIY LP Special pt. 2
Today I worked with the headstock. The kit comes with a paddle-shaped headstock, so it is possible to cut it to almost any shape. I decided to go with the traditional open book look, and I traced a guide from a Warmoth neck. It is not exactly Gibson style but a bit thinner and with less pronounced open book shape.
After drawing the shape to the paddle using the paper guide, I started sawing the rough outline with a coping saw. The result looked as bad as I thought it would, and it took quite an effort to get anything done. However, sanding was much easier job and the result looks pretty good to my eye, taking into account that this was my first attempt.
A note: When sawing, make sure that the saw is perpendicular to the surface. Especially, as there is an angle between the headstock and the neck, make sure to saw perpendicular to the heastock, not to the neck itself.
I also glued the neck to the pocket using Titebond. I planned on taking photographs, but I immediately messed up my hads with the glue so I did not take any shots after all. The process was easy, spreading the glue and clamping the neck to the pocket. I let it dry with the clamp for 40 minutes, and now it is still drying without the clamp. I'll take some closer shots tomorrow.
After drawing the shape to the paddle using the paper guide, I started sawing the rough outline with a coping saw. The result looked as bad as I thought it would, and it took quite an effort to get anything done. However, sanding was much easier job and the result looks pretty good to my eye, taking into account that this was my first attempt.
A note: When sawing, make sure that the saw is perpendicular to the surface. Especially, as there is an angle between the headstock and the neck, make sure to saw perpendicular to the heastock, not to the neck itself.
I also glued the neck to the pocket using Titebond. I planned on taking photographs, but I immediately messed up my hads with the glue so I did not take any shots after all. The process was easy, spreading the glue and clamping the neck to the pocket. I let it dry with the clamp for 40 minutes, and now it is still drying without the clamp. I'll take some closer shots tomorrow.
Friday, 29 May 2020
Hosco DIY LP Special pt. 1
I have built six years ago a jazz bass from the neck and body blanks from espen.de. The bass turned out great, and I have many times thought that it would be nice to build a guitar, too, someday. I have been thinking about ordering Precision Guitar Kit woods from Canada, but they are seldom available in stock, and with shipping, tax and toll it would make more sense to buy a ready-made Gibson of a same sort.
One day I came across Hosco branded guitar kits from Japan. Like Wilkinson, Hosco is supposed to be a low budget brand with decent quality, and it is rumored that is is actually same company as Gotoh. I have used some Hosco hardware (bridges and tuners) before, and I have been happy with them, so I decided to order a Hosco LP Special kit from Sweden. The cost was around 260 € with the shipping. Not as cheap as a Harley Benton kit (around 150 €), but this kit has full Les Paul specs including a set mahogany neck, mahogany body, a rosewood fretboard and Japanese made P90 pickups.
So, I got the kit today and opened the box carefully. First impressions were good, everything was neatly packed, and there were some Japanese newspaper tolls to fill the empty space inside the main box. Harware came in three plastic bags, and the neck and the body were both packed in separate cardboard boxes. There is an instruction manual of a few pages included, and I ordered a flask of Titebond glue with the kit.
The overall impression of the wood parts is good. The woodwork is mostly neat, there are sopme chips visible, I found one in the body and one in the neck, but overall the impression is really good. The neck joint looks and feels perfect to me, and the neck angle seems to be right. The neck seems straight and with quick inspection with a credit card, the frets seem level. The frets seem to be of medium size, not vitage or jumbo. The neck is also of medium depth, closer to a 59 than a slim taper. There is a scarf joint in the neck and there is some additional wood glued to the heel, so the neck is actually a three-piece construction. Same goes with the body, it seems to be constructed of three pieces of mahogany. Both of them look nice and feel realively light in my hands.
The harware quality remains to be seen. Everything seems to be in place, there are modern style tuners (of heavier side), and P90 pickups. Also, a wiring harness is included. It was a nice surprize that the plastic parts seemed to fit properly, and the tuss rod cover and scratchplate were three-ply instead of being the cheapest kind of one-ply black.
Some observations:
- The neck and body have been somehow matched. There is same number in the heel and in the pocket.
- There are some rough spots in the sanding that need to be ironed out.
- The fret ends do not seem too sharp.
- Bridge pickup cavity seems really shallow, meaning that the pickup stays high in the lowest possible position. It remains to be seen if this causes problems. It will be relatively easy to deepen the cavity with a drill, so I'm not too worried. However, I need to test this before installing the shielding tape.
- The manual starts with the instructions how to cut the fretboard to the right length, and how to prepare a place for the nut. That is a good way to fuck up the whole guitar. After taking the measures I noticed that this had been done already. Phew!
The next step it to shape the headstock, it is now a big paddle. I'm thinking about going for the traditional open book style. That will be the topic of the next post.
Also, I originally thought of painting this black. However, the wood seems so beautiful that it would be a shame to cover it, so now I'm thinking about dark brown oil finish. I need to go tomorrow to a hardware store and get myself at least a saw and some wood finishing oil.
One day I came across Hosco branded guitar kits from Japan. Like Wilkinson, Hosco is supposed to be a low budget brand with decent quality, and it is rumored that is is actually same company as Gotoh. I have used some Hosco hardware (bridges and tuners) before, and I have been happy with them, so I decided to order a Hosco LP Special kit from Sweden. The cost was around 260 € with the shipping. Not as cheap as a Harley Benton kit (around 150 €), but this kit has full Les Paul specs including a set mahogany neck, mahogany body, a rosewood fretboard and Japanese made P90 pickups.
So, I got the kit today and opened the box carefully. First impressions were good, everything was neatly packed, and there were some Japanese newspaper tolls to fill the empty space inside the main box. Harware came in three plastic bags, and the neck and the body were both packed in separate cardboard boxes. There is an instruction manual of a few pages included, and I ordered a flask of Titebond glue with the kit.
The overall impression of the wood parts is good. The woodwork is mostly neat, there are sopme chips visible, I found one in the body and one in the neck, but overall the impression is really good. The neck joint looks and feels perfect to me, and the neck angle seems to be right. The neck seems straight and with quick inspection with a credit card, the frets seem level. The frets seem to be of medium size, not vitage or jumbo. The neck is also of medium depth, closer to a 59 than a slim taper. There is a scarf joint in the neck and there is some additional wood glued to the heel, so the neck is actually a three-piece construction. Same goes with the body, it seems to be constructed of three pieces of mahogany. Both of them look nice and feel realively light in my hands.
The harware quality remains to be seen. Everything seems to be in place, there are modern style tuners (of heavier side), and P90 pickups. Also, a wiring harness is included. It was a nice surprize that the plastic parts seemed to fit properly, and the tuss rod cover and scratchplate were three-ply instead of being the cheapest kind of one-ply black.
Some observations:
- The neck and body have been somehow matched. There is same number in the heel and in the pocket.
- There are some rough spots in the sanding that need to be ironed out.
- The fret ends do not seem too sharp.
- Bridge pickup cavity seems really shallow, meaning that the pickup stays high in the lowest possible position. It remains to be seen if this causes problems. It will be relatively easy to deepen the cavity with a drill, so I'm not too worried. However, I need to test this before installing the shielding tape.
- The manual starts with the instructions how to cut the fretboard to the right length, and how to prepare a place for the nut. That is a good way to fuck up the whole guitar. After taking the measures I noticed that this had been done already. Phew!
The next step it to shape the headstock, it is now a big paddle. I'm thinking about going for the traditional open book style. That will be the topic of the next post.
Also, I originally thought of painting this black. However, the wood seems so beautiful that it would be a shame to cover it, so now I'm thinking about dark brown oil finish. I need to go tomorrow to a hardware store and get myself at least a saw and some wood finishing oil.
Long time no see
It has been awfully quiet here. I know! Sorry :)! I think that keeping the blog on the VI album was fun, but somehow I did not get the grips to write any posts afterwards. Yes, I have written two solo albums since.
The first after Synkissä väleissä is called Syksy (Autumn), and it is something completely different. I enjoy ambient music a lot, and listen to it mostly while working, and decided to try to write an album myself. I used only my old and dusty Korg DW8000 synthesizer and some effects along with a sequencer. I'm not that satisfied with the results, as the album turned out still not-that-ambient-but too-much-music, but I did my best. Better luck next time.
The latest one, Kotiseutumatkailua, is a kind of mixture of doom, blues, and Guitar Hero. I had the concept in mind while I improvised the basic drum tracks. I recorded maybe ten takes, and started experimenteing. I composed some riffs on top of the drums, selected the most promising ones, and continued from that to the bass parts. After that came the guitar solos, and in the end I added some synths. Sounds easier now than how it felt while was playing the solos.
The first after Synkissä väleissä is called Syksy (Autumn), and it is something completely different. I enjoy ambient music a lot, and listen to it mostly while working, and decided to try to write an album myself. I used only my old and dusty Korg DW8000 synthesizer and some effects along with a sequencer. I'm not that satisfied with the results, as the album turned out still not-that-ambient-but too-much-music, but I did my best. Better luck next time.
The latest one, Kotiseutumatkailua, is a kind of mixture of doom, blues, and Guitar Hero. I had the concept in mind while I improvised the basic drum tracks. I recorded maybe ten takes, and started experimenteing. I composed some riffs on top of the drums, selected the most promising ones, and continued from that to the bass parts. After that came the guitar solos, and in the end I added some synths. Sounds easier now than how it felt while was playing the solos.
Subscribe to:
Posts (Atom)