Thursday 17 June 2021

Hosco SG pt. 5

I made the final assembly last night. It was an easy job, and I had no special difficulties there. The nut was cut properly out of the box, so there was nothing to do with it but just putting it to its place. I shielded the mic cavities and control cavity with copper tape, and installed the electronics which were perfectly pre-wired. One of the small tuner screws was missing, and one pickup ring screw was of wrong kind, but otherwise everything was perfect. Oh, poker chip was missing, but that really depends on the SG whether it is used or not. 

I will comment the guitar as an instrument later on. I have put the setup to my liking, and despite little twist on the neck it plays well. The pickups sound really good (they are GFS Mean 90, I already put the stock pickups to my Warmoth Les Paul). 

In daylight the guitar looks bright and lively red, but in shade and indoors kind of purple and dark. 

Some pictures in a daylight:


Friday 11 June 2021

Hosco SG pt. 4

Trying on the parts, just for the fun of it. The pickups are GFS Mean 90, let's see how mean they are. 

The next step will be the shielding the pickup and pot cavities. 


Here is a view on the headstock, and it looks really black: 


Thursday 10 June 2021

Hosco SG pt .4

Now it was time to apply the Danish oil finish. I sanded the surface lightly to 320 grit trying to avoid sanding through the stain. Then, three coats in a row, 20 minute pause, another coat, 20 minute pause, yet another coat, 20 minute pause, wipe excess away, pause for an hour, wipe again, pause for an hour, and wipe again. Then wait at least 48 hours. 

With the Les Paul Special, it actually took several weeks for the finish to dry fully. It smelled lightly oily and every now and then the neck felt a tiny bit sticky. Wiping it with a cloth helped every time. Eventually it stopped doing that so I assume that all the oil finally got into the wood. 

And by the way, those red drips on the wall are not mine! The house was painted a year or so back, and the "professionals" did that. 

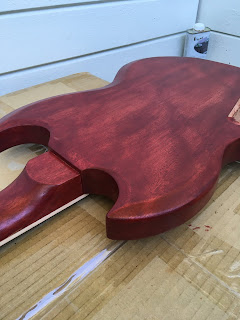
Again, it is very difficult to capture the true colour. It is dark red, but not towards purple but more of a brown. What the picture tells right, is that the colour is very uneven. However, what can't be seen from the picture is that the unevenness plays withe the light kind of nicely. So it is not juts spotty paint job, but the unevenness is deep in the wood itself.  

The India Ink on the headstock behaved well. It didn't dilute on the Danish oil so it stayed smooth and even. Great. I could imagine dying the whole guitar black with it. 

Starting point:


After the first three coats:


 After all the coats and some time to dry:


Next morning in the sunlight:


Monday 7 June 2021

Hosco SG pt. 3

I decided to dye the headstock black, just for the sake of it. I used India Ink, and I think that the result looks good. I have no idea how it behaves with Danish oil, but we will see it in a few days if everything goes well.


Wednesday 2 June 2021

Hosco SG pt. 2

I glued the neck in. It is held to its place with really small footprint of glue. No wonder SGs are prone to flex in the neck. Anyway, after gluing I noticed that I forgot to dye the heel of the neck at the end of the fretboard red. It won’t be visible if I decide to put plastics on. 


Wednesday 26 May 2021

Hosco SG pt. 1

Ha, it is almost a year since the last update. Well, I have not been too active on the solo music career. I have mostly noodled around, trying different things on synths and guitars, trying to figure out what to do next. 

However, as the summer is approaching, I started building the Hosco SG I bought as a kit last year. Since the winters in Finland are very cold and I have no indoor place that is ventilated well enough to deal with the fumes from the stains and oils, I have to do majority of the building outdoors when it is warm enough. During last winter, I shaped the headstock, drilled the tuner holes (they were too small for the tuners that came with the kit) and sanded the body and neck down to 320 grit.

I thought that I would stain the guitar cherry red in the fashion of Gibsons. A few weeks ago I got some cherry stain from local supermarket, and started staining just to find out that the cherry color was the color of cherry wood, not the cherry the berry. So, I ended up in light brown guitar, and I did not like it at all. I had to order red stain from online store, and today I stained the guitar again. I did not remove the previous stain, I just sanded it down to 320 grit again. The result looks rather good to me. The wood is heavily figured, so the stain looks figured as well. I think it looks better at this stage than the SG Junior did before applying the Danish oil. 

If it doesn't rain tomorrow, I will glue the neck to its place.  

By the way, the neck looks slightly twisted. It remains to be seen if it causes problems.